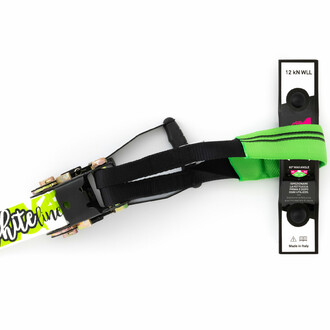
Wall/floor mounting on one side, a shackle on the other
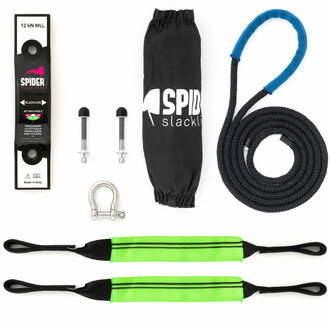
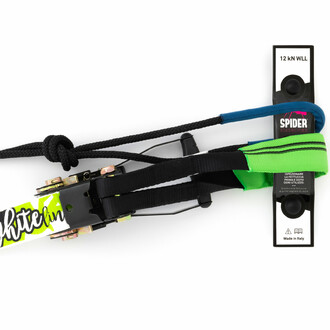
This product is a kit. The set includes a single wall tray. Expansion bolts, connecting strap, ratchet guard, safety rope, and shackle.
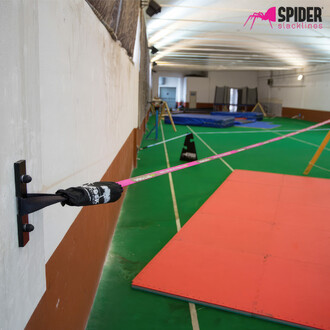
Indoor Kit to Attach Your Slackline to a Wall
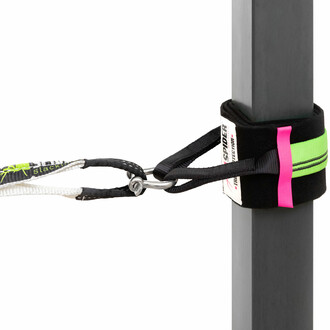
This indoor kit is designed to install a slackline in a gym, school or at home. The kit includes an anchor plate with rounded edges in SIMPLE size (30x5x1.5 cm), suitable for installation on concrete wall or floor with expansion bolt fixing. Compatible with all standard ratchets for 50 mm straps, this kit also includes Ø12 mm bolts with cap, connecting strap, ratchet cover, 230 cm Ø9.5 mm safety rope, 1 shackle, 5 T 12 mm to connect the slackline to a pole, and an instruction manual. The slackline is sold separately. Made in Italy, this kit offers several options, the main one being fixing the slackline between a wall and a pole.

NetJuggler's opinion on the Slackline Anchor Kit
NetJuggler supplies many educational establishments where setting up an anchor plate can be done easily in gymnasiums to then install and uninstall your slacklines with ease. If this kit does not do exactly what you want, we have several kits which are variations of this one, I invite you to look around a little in our section dedicated to wall anchors in the slacklines part of our store. This turnkey solution is simple and effective. I'll give you advice a little further down this page to help you decide at what height to put the tray.

Product Features
- Material: steel plate with rounded edges
- Type of wall tray: SIMPLE 30x5x1.5 cm
- Installation conditions: concrete wall or floor
- Compatibility: standard ratchets for 50mm straps
- Contents: Ø12 mm bolts with cap, connecting strap, ratchet cover, 230 cm Ø9.5 mm safety rope, 1.5 T 12 mm shackle
- Slackline sold separately
- Made in Italy

Type of audience the product is aimed at
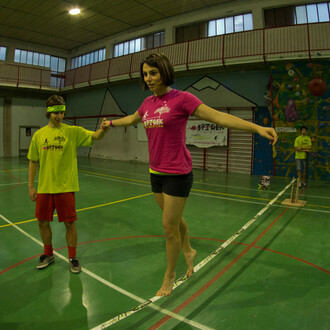
This kit is ideal for gyms, schools and homes, and is suitable for various types of users, including children, beginners, and athletes. Slacklining contributes to the development of motor skills and educational skills. By adjusting the height of the slackline, this kit can be adapted to the specific needs of each user, making learning and practicing slacklining accessible and safe.
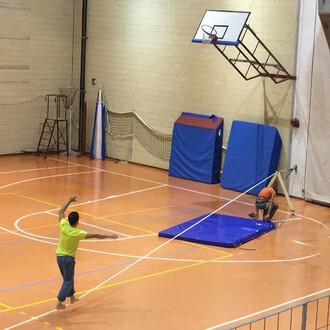
Use the diagonal of your room to cover more meters
The INDOOR KIT plate allows you to work diagonally up to a maximum of 60° from the perpendicular to the wall. You can thus take advantage of the diagonals of the room or the gymnasium to gain meters of walking on the line.
If you choose DOUBLE FLAT from the options, using the diagonals you can simultaneously stretch two lines from the same anchor point.

How to choose the height from the ground to drill into the wall and place the plate?
We recommend choosing the height from the ground to attach the plate, depending on the length of the slackline (from 5 to 50 m) and the type of user (children, adults, athletes). Here are some of the most used combinations in gyms:
- Plate 15 cm from the ground : With the use of STANDS , you can raise the slackline to the height desired by the user (children 30 cm, beginners 70 cm, athletes 140 cm). Any line length can be adjusted with high or low stands.
- Plate 70 cm from the ground : If the length of the slackline is less than 10 m and the mattress is between 2 and 20 cm.
- Plate 120 cm from the ground : If the length of the slackline is less than 20 m and the mattress is between 10 and 30 cm.
- Plate 180 cm from the ground : If the length of the slackline is between 20 and 50 m and the mattress is between 20 and 50 cm.
If the gym floor is concrete, you can also attach the plate to the floor and, still with the STANDS , raise your slackline to the desired height.
Are frame supports still required?
Absolutely not, the slackline can be fixed directly between two plates without STANDS support.
The STAND is simply a support to adjust the height of the line with the user. So it is necessary if different users play with the same anchor plate.
Warning : If the plate is fixed 15 cm from the ground, the STAND requires a minimum distance from the wall to function correctly, equal to 2.5x the height of the STAND . For example, a 100 cm STAND with a floor anchor must be positioned 2.5 m from the wall.
Can I use the slackline with two ratchets?
Yes, INDOOR KIT is compatible with classic slackline kits, for example TRAINING LINE 18 which works with a single pawl, and with trickline kits like PRO LINE 25 or FLY LINE 35 with two pawls.
You can also choose to increase the tension of your kit by adding a ratchet from the accessories available in the trickline accessories section.
What remains attached to the KIT INDOOR plate after use?
INDOOR KIT allows you to dismantle all the components of the plate, leaving only the black plate with rounded edges fixed to the wall in the gym.
During use, we recommend covering the ratchet with the RATCHET PROTECTION shell which hides the ratchet and prevents any inexperienced user from accidentally tampering with it.
Certifications
All components of the INDOOR KIT are certified by the manufacturer to guarantee user safety.
Have an expert check that the wall you want to drill is suitable for expansion bolts. The wall must be solid concrete, not bricks, plasterboard or hollow surfaces of any kind.
Manufacturer Information Spider Slacklines
Spider Slacklines is an Italian company founded in 2012 in the province of Bergamo by Edoardo Galizzi and Dario Cinchetti. Specializing in the promotion and development of slacklining, this company combines passion for outdoor sports and professional rigor.
After a snowboarding accident in 2008, Edoardo discovered the therapeutic benefits of slacklining. Convinced of its benefits, he collaborated with Dario to create products tested and approved by professional athletes. Together, they formed a team dedicated to the continuous improvement of their equipment.
Spider Slacklines stands out for its commitment to offering high quality, safe and efficient products, adapted to the needs of beginners and experts alike. Their goal is to allow everyone to fully enjoy slacklining, in complete safety.
People who bought this item also bought the following items


Double wall mount + 2 wall mounts
Everything is fixed with wall shelves. A board is double. To attach 2 slacklines.

Ninja Wheel - Slackers
Easy to set up and fun for the entire family, the Ninja Wheel fits onto your Ninja Line!

Pedalo® 300 vertical climbing board
Strengthens grip, traction and body stability with varied exercises.

Slackline attachment: 2 wall plates
Side 1 and 2 : (2x) wall tray: Shackle, strap and protections included
Comment / Question
!Be the First to comment!
